Boat Trailer Lights Replacement (for replacing existing trailer lights)
 
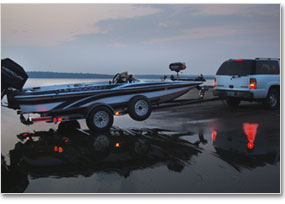
A boat trailer is arguably the most important piece of equipment for the mobile angler; it’s also usually the least respected and maintained.

Fortunately, trailer construction quality has never been a real issue from reputable boat builders, and wheel bearings and tires are the best they’ve ever been. What continues to haunt many boaters though are their trailer lights. It’s a surprise they ever work at all with the continuous abuse they take from road vibration, being constantly showered with road grit and grime, and, of course, always going in and out of the water.

Some boaters just accept the fact that their trailer lights aren’t going to work. Others at least go through the motions of jiggling wires and thumping lens covers to try to get them to illuminate before accepting whatever the outcome and hitting the road anyway. But the bottom line is, trailer lights are required by law to work.

Nobody likes getting a ticket for non-working trailer lights, but no one can question the logic behind the safety concerns of compliance. Trailers must be visible from all directions and stop/turn/tail lights must properly function. The good news is, replacing and keeping trailer lights working is easier now than it has ever been.

Optronics understands the difficulty that do-it-yourselfers often have in determining the right replacement lights for their trailers, or even determining what trailer lighting is currently required by law in the first place. Therefore, we’ve provided charts and descriptions below to help with your selections. We’ve also assembled information pertinent to the light replacement process.

Don’t let malfunctioning boat trailer lights discourage plans for an outing or be the reason for cutting a day trip short. Instead, become safe, legal and bright again by fixing, updating or upgrading trailer lights with one of the easy to install light replacement kits from Optronics.

Basic Equipment Requirements
Click here for the Federal Lighting Equipment Location Requirements.


BASIC REPLACEMENT LIGHT INSTALLATION PROCESS

To replace existing trailer lights, find the appropriate Optronics trailer light model, incandescent or LED, to fit the current placement or cutout in the trailer’s frame.

Tools and items needed

  • Screwdriver
  • Wire cutter/stripper/crimper
  • Pair of needle nose pliers
  • Wire nuts or connectors
  • Electrical tape

Things to know (general rules, but could vary if not a domestic vehicle or original equipment)

YELLOW wire Driver side Turn and Brake light
BROWN wire Tail, Marker, Clearance and License light
GREEN wire Passenger side Turn and Brake light
BLACK wire Side marker
BLUE wire  Trailer brake lockout/reverse lights
WHITE wire Ground
Safety precautions before starting
  1. Park the trailer on level ground in an area void of all traffic.
  2. Chock front and back of at least one tire.
  3. Disconnect power source to trailer lights.

A thoughtful approach

  1. Check the vehicle’s trailer light connector before proceeding to make sure it is working properly to minimize trouble shooting should you experience trailer light issues upon completion.
  2. Remove/replace lights in respective pairs, to stay focused and knowing the second one is always easier.
  3. Study each light before removing, observing housing, wire colors, wire connections, and to make sure replacement light is correct.
  4. Keep all tools and parts together in a common carrier (bucket, cardboard box, etc.).
  5. Fully complete each installation before moving to the next.
  6. Make written note of anything needing further attention upon completion.

Get to work replacing those lights

Okay, it’s time to get those lights replaced. Although the process won’t take long, be sure to start it when you have time and aren’t on a schedule. It’s not the kind of job you want to start when getting home at 5:30 p.m. on a Friday afternoon with intentions of rushing through it so you can go to the lake that night. However, it is a good project for just about any other weeknight.

Here are a few steps to follow in their simplest from. Repeat the same process for each light being replaced.

Step 1
Either undo the wire connector or cut the wire, making sure to leave enough length to reconnect the trailer wire to the new light’s wire.

Step 2
Remove the old light and base (depending on style).

Step 3
Attach new light and base to trailer frame, according to mount type (grommet or screws).

Step 4
Match and connect light’s wires to trailer’s wires. Ground to trailer frame, if required.

Step 5
If the light is a model that has its own plug, lubricate the male and female connectors with the white grease provided and complete the connection.

Step 6
Once all lights have been replaced, also apply white grease to both the vehicle’s trailer plug and the trailer’s plug to help protect each against moisture and corrosion.

Step 7
Give a walk-around inspection of all newly installed lights, making sure all connections/plugs are connected.

Step 8
Reconnect to vehicle power to test all trailer lights. Check trailer lights for all the same functions of the vehicle’s lights: parking, brake, turn signals and reverse (if the trailer has this function).

Step 9
Make a final walk-around inspection, this time making sure no wires are hanging down but are as close to the frame as possible so they won’t snag on road obstacles.

Step 10
Head to the lake with lights on and both you and your trailer beaming proudly.

Most Common Troubleshooting Fixes

* None of the trailer’s lights work
Re-check the vehicle’s trailer plug. An inexpensive circuit tester is a good way to do this. It plugs into the vehicle’s trailer socket and will indicate if power is reaching the plug. If the tester indicates power at the vehicle’s trailer connection, then the problem likely exists in the trailer’s plug. Inspect it for damage and replace as appropriate.

* Certain trailer lights don’t work
The problem is most likely at the light’s connection to the trailer’s wiring. Check wire connections and/or the light’s own plug if it has one. If after that it still doesn’t work, use a 12-volt test light to make sure the trailer wire feeding the light does have power. If it doesn’t, trouble shoot the trailer wire back to all connections leading to the trailer’s main plug.

* Certain lights are dim, while others are bright
Definitely a grounding issue at the light itself. If you used the old light’s base and just plugged the new one into it, check how the base is mounted to the frame. If riveted, the rivets have likely vibrated loose and contact with the frame is poor. Drill out the rivets and replace with stainless or brass screws. If screws, they likely are corroded and should be replaced. In either case, now go ahead and also install the new base.

* All trailer lights are dim, or fade in and out
It’s a grounding issue at either the vehicle’s trailer plug or the trailer’s plug to the frame. In both cases, make sure the white ground wire is attached to the respective frame with a screw.

* After trying everything, one light still doesn’t work
It is rare, but is a possibility that the light was damaged during shipment or has simply failed for some reason. If an Optronics light, all you need to do is contact Optronics’ customer service and explain the situation, and when and where the light was purchased, to get a prompt replacement.

* Trailer wiring is a total mess
Don’t waste your time trying to patch and fix problems that come from old, weathered wiring or from someone else’s makeshift patchwork when you can easily run a brand new Optronics trailer wiring harness instead. A helpful tip for doing this is to not pull your old wiring out first, but use it to help feed your new wiring through the frame. Simply fasten each side of the new wire to the old wire up at the farthest point forward (basically the trailer’s plug), and then go to the farthest point at the rear of the trailer (typically the ID light bar) and pull the old wire out and the new wire into place. Repeat on the opposite side. You will need to splice accessory wires at the appropriate locations for side markers and such, but it is a much quicker and easier fix for problematic wiring issues.

 
All LED trailer lights are not created equal. A partial single row of LEDs is all that remains working on this boat trailer’s "waterproof" right tail light after replacement only 15 months ago. Optronics LEDs are potted to seal out water. Notice the reflector replaced at the same time is also missing.


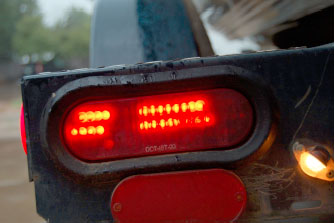
More blinkety-blink LEDs. The left tail light on the same boat trailer hasn’t fared much better than the right. Although it has two rows of LEDs working, neither is a full row. The owner is faced with having to already replace tail lights again in less than two years.


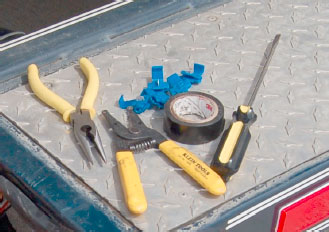
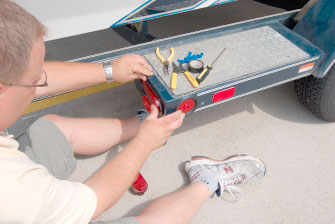
Only basic tools needed. A pair of needlenose pliers, wire cutter/stripper, wire connectors or nuts, screwdriver and electrical tape are all you need to install most Optronics replacement light kits.


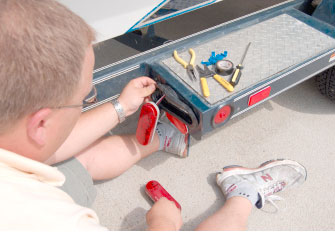
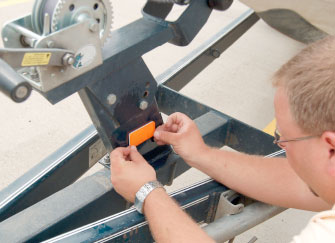
Oval grommet tail lights a snap to replace. Any adept handyman or woman can install a replacement Optronics trailer light without problem. Each replacement kit comes with the sealed light insert, rubber grommet and pigtail.


That’s all there is to it. Connect the pigtail to the trailer’s wire using wire connectors or wire nuts. Plug the pigtail into the back of the LED cartridge. Fit the cartridge into the rubber grommet. Done!


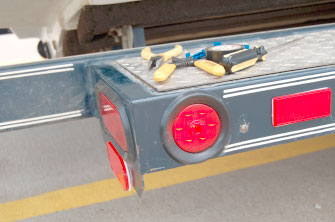
A new, shiny hiney. With the tail light, side clearance light, and rear and side reflectors in place, the old trailer has a new beaming rear end.


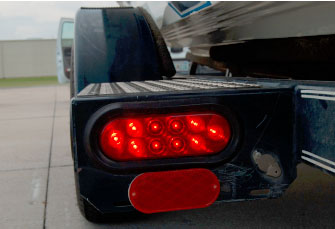
Bold and the beautiful. The new Optronics LED tail light shines brightly, even in daylight, where once before the not-so-old brand X replacement light looked like a bad jack-o-lantern grin.


New lights spruce up old trailer. Even with time and road wear rust spots, new trailer lighting makes an old trailer look good. More importantly, it makes an old trailer road-legal and safe for everyone on the highways.


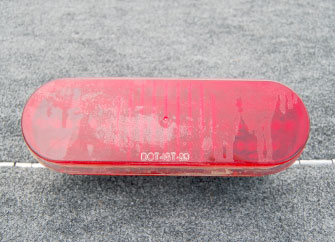
It said it was waterproof. The brand X LED light said waterproof trailer light on the packaging. But after removal and closer examination, it’s easy to see part of the reason for failure was serious amounts of water had gotten on the inside.


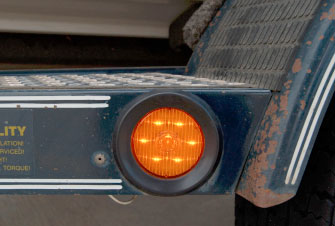
Won’t pass as Rudolph. But the amber reflector on the trailer’s bow stop area serves to illuminate an otherwise dark area of the trailer when hit by headlights, whether passing through an intersection or sitting idle in a boat ramp parking lot.


HOME  |  ABOUT US  |  CONTACT US

NEW PRODUCTS  |  Panelite Millennium Series  |  Truck & Trailer  |  RV Interior  |  Fog/Driving  |  12-Volt Accessories

Optronics Spotlights  |  Hands-free Headlamps  |  Fish-N-Lites  |  Docking Lights

Replacing Boat Trailer Lighting

OPTRONICS, INC. 401 S. 41st Street East Muskogee, OK 74403 USA
ph: 800-364-5483  fx: 918-683-9517